How to bootstrap feature flags in React and Express

Mar 06, 2025

Bootstrapping feature flags makes them available as soon as React and PostHog load on the client side. This enables use cases like routing to different pages on load, all feature flagged content being available on first load, and visual consistency.

To show you how you can bootstrap feature flags, we are going to build a React app with Vite, add PostHog, set up an Express server to server-side render our app, and finally bootstrap our flags from the server to the client.

Already have an app set up? Skip straight to the feature flag bootstrapping implementation.

Create a React app with Vite and add PostHog

Make sure you have Node installed, then create a new React app with Vite:

Terminal
npm create vite@latest client -- --template react

Once created, go into the new client folder and install the packages as well as posthog-js and its React wrapper:

Terminal
cd client
npm install
npm i posthog-js

Next, get your PostHog project API key and instance address from the getting started flow or your project settings and set up environment variables to store them. You can do this by creating a .env.local file in your project root:

Terminal
# .env.local
VITE_PUBLIC_POSTHOG_KEY=<ph_project_api_key>
VITE_PUBLIC_POSTHOG_HOST=https://us.i.posthog.com

Next, create your entry point for client-side rendering in src/entry-client.jsx:

JSX
// src/entry-client.jsx
import { StrictMode } from 'react'
import { createRoot } from 'react-dom/client'
import './index.css'
import App from './App.jsx'
import { PostHogProvider } from 'posthog-js/react'
const options = {
api_host: import.meta.env.VITE_PUBLIC_POSTHOG_HOST,
}
createRoot(document.getElementById('root')).render(
<StrictMode>
<PostHogProvider apiKey={import.meta.env.VITE_PUBLIC_POSTHOG_KEY} options={options}>
<App />
</PostHogProvider>
</StrictMode>,
)

Update your index.html to point to this file:

HTML
<!DOCTYPE html>
<html lang="en">
<head>
<meta charset="UTF-8" />
<link rel="icon" type="image/svg+xml" href="/vite.svg" />
<meta name="viewport" content="width=device-width, initial-scale=1.0" />
<title>Vite + React</title>
</head>
<body>
<div id="root"></div>
<script type="module" src="/src/entry-client.jsx"></script>
</body>
</html>

If you want, you can run npm run dev to see the app in action.

Create and setup a feature flag

If we want to bootstrap a feature flag, we first need to create it in PostHog. To do this, go to the feature flag tab, create a new flag, set a key (I chose test-flag), set the rollout to 100% of users, and save it.

Once done, you can evaluate your flag in the loaded() method on initialization like this:

JavaScript
const options = {
api_host: import.meta.env.VITE_PUBLIC_POSTHOG_HOST,
loaded(ph) {
console.log(ph.isFeatureEnabled('test-flag'))
}
}

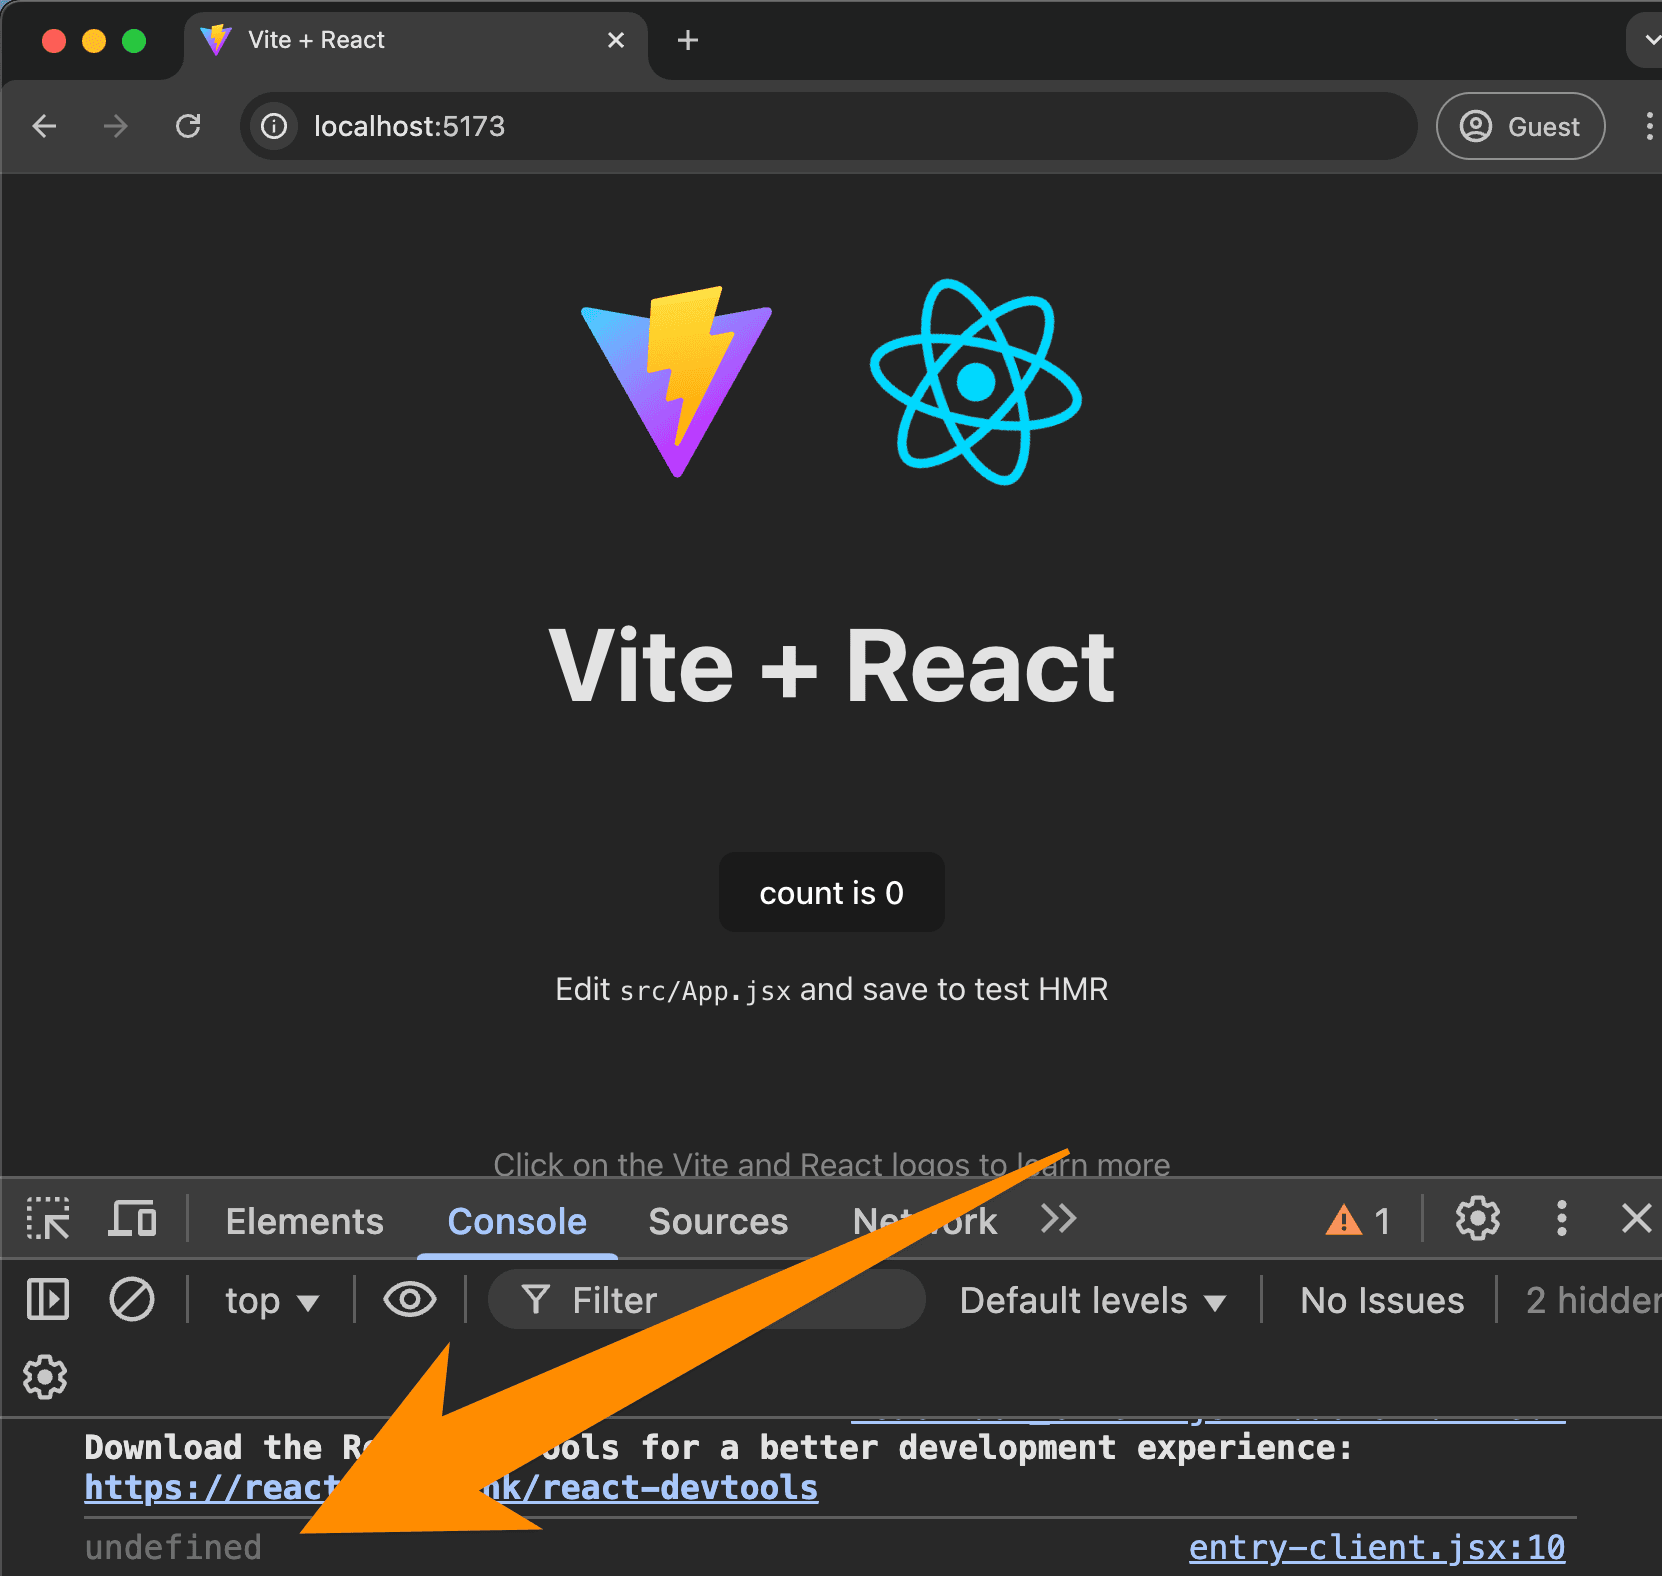
This shows us bootstrapping is valuable. On the first load of the site (before the flag is set in cookies), you see undefined in the console even though the flag should return true. This is because the flag isn't loaded yet when you check it, and the flag might not show the right code on the initial load for that user.

Undefined

Bootstrapping flags solves this.

Set up the React app for server-side rendering

To bootstrap our flags, we fetch the feature flag data on the backend and pass it to the frontend before it loads. This requires server-side rendering our React app.

To do this with Vite, we need:

  1. A server entry point for rendering React on the server
  2. A client entry point for hydrating the app in the browser
  3. An Express server to get feature flags from PostHog and serve the React app

We'll start with the server entry point by creating src/entry-server.jsx:

JSX
// src/entry-server.jsx
import React from 'react'
import { renderToString } from 'react-dom/server'
import App from './App'
export function render() {
const html = renderToString(
<React.StrictMode>
<App />
</React.StrictMode>
)
return html
}

Next, modify your client entry point to support hydration in src/entry-client.jsx:

JSX
// src/entry-client.jsx
import { StrictMode } from 'react'
import { hydrateRoot } from 'react-dom/client'
import './index.css'
import App from './App'
import { PostHogProvider } from 'posthog-js/react'
const options = {
api_host: import.meta.env.VITE_PUBLIC_POSTHOG_HOST,
loaded(ph) {
console.log(ph.isFeatureEnabled('test-flag'))
}
}
// Use hydrateRoot instead of createRoot for SSR
hydrateRoot(
document.getElementById('root'),
<StrictMode>
<PostHogProvider apiKey={import.meta.env.VITE_PUBLIC_POSTHOG_KEY} options={options}>
<App />
</PostHogProvider>
</StrictMode>
)

With this done, we can move on to setting up our server-rendering Express app.

Set up our server-rendering Express app

To get the feature flags data on the backend and pass it to the frontend, we need to set up an Express server that:

  1. Gets or creates a distinct ID for PostHog
  2. Uses it to get the feature flags from PostHog
  3. Injects the feature flags data into the HTML
  4. Sends the HTML back to the client

This starts by installing the necessary packages:

Terminal
npm install express cookie-parser posthog-node uuid dotenv
npm install --save-dev nodemon

Next, create a server directory in the root of your project and a index.js file inside it:

Terminal
mkdir server
touch server/index.js

In this file, start by importing everything we need, setting up the environment variables, and initializing the PostHog client:

JavaScript
// server/index.js
import express from 'express';
import fs from 'fs';
import path from 'path';
import { fileURLToPath } from 'url';
import { createServer as createViteServer } from 'vite';
import cookieParser from 'cookie-parser';
import { v4 as uuidv4 } from 'uuid';
import { PostHog } from 'posthog-node';
// Import environment variables
import dotenv from 'dotenv';
dotenv.config();
const __dirname = path.dirname(fileURLToPath(import.meta.url));
// Initialize PostHog client
const client = new PostHog(
process.env.VITE_PUBLIC_POSTHOG_KEY,
{
host: process.env.VITE_PUBLIC_POSTHOG_HOST,
personalApiKey: process.env.POSTHOG_PERSONAL_API_KEY // This one is server-only
}
);

Next, create a function to create and start the server:

JavaScript
// ... existing code
async function createServer() {
const app = express();
// Use cookie parser middleware
app.use(cookieParser());
// Create Vite server in middleware mode
const vite = await createViteServer({
server: { middlewareMode: true },
appType: 'custom'
});
// Use vite's connect instance as middleware
app.use(vite.middlewares);
app.use('*', async (req, res, next) => {
const url = req.originalUrl;
try {
// More code here soon...
} catch (e) {
// If an error is caught, let Vite fix the stack trace for better debugging
vite.ssrFixStacktrace(e);
console.error(e);
next(e);
}
});
app.listen(3000, () => {
console.log('Server started at http://localhost:3000');
});
}
createServer();

In the route's try block, we'll get or create a distinct ID and use it to get the feature flags:

JavaScript
try {
// Get or create distinct ID
let distinctId = null;
const phCookie = req.cookies[`ph_${process.env.VITE_PUBLIC_POSTHOG_KEY}_posthog`];
if (phCookie) {
distinctId = JSON.parse(phCookie)['distinct_id'];
}
if (!distinctId) {
distinctId = uuidv4();
}
// Get all feature flags for this user
const flags = await client.getAllFlags(distinctId);
// More code here soon...

Once we have them, we'll inject them into the HTML and send it back to the client.

JavaScript
// ... existing code
// 1. Read index.html
let template = fs.readFileSync(
path.resolve(__dirname, '../index.html'),
'utf-8'
);
// 2. Apply Vite HTML transforms
template = await vite.transformIndexHtml(url, template);
// 3. Load the server entry
const { render } = await vite.ssrLoadModule('/src/entry-server.jsx');
// 4. Render the app HTML
const appHtml = await render(url);
// 5. Inject the app-rendered HTML and feature flag data into the template
const serializedFlags = JSON.stringify(flags);
const serializedDistinctId = JSON.stringify(distinctId);
const scriptTag = `<script>window.__FLAG_DATA__ = ${serializedFlags}; window.__PH_DISTINCT_ID__ = ${serializedDistinctId};</script>`;
const html = template
.replace(`<div id="root"></div>`, `<div id="root">${appHtml}</div>`)
.replace('</head>', `${scriptTag}</head>`);
// 6. Send the rendered HTML back
res.status(200).set({ 'Content-Type': 'text/html' }).end(html);
} catch (e) {
// ... existing code
See the full index.js file
JavaScript
// server/index.js
import express from 'express';
import fs from 'fs';
import path from 'path';
import { fileURLToPath } from 'url';
import { createServer as createViteServer } from 'vite';
import cookieParser from 'cookie-parser';
import { v4 as uuidv4 } from 'uuid';
import { PostHog } from 'posthog-node';
// Import environment variables
import dotenv from 'dotenv';
dotenv.config();
const __dirname = path.dirname(fileURLToPath(import.meta.url));
// Initialize PostHog client
const client = new PostHog(
process.env.VITE_PUBLIC_POSTHOG_KEY,
{
host: process.env.VITE_PUBLIC_POSTHOG_HOST,
personalApiKey: process.env.POSTHOG_PERSONAL_API_KEY // This one is server-only
}
);
async function createServer() {
const app = express();
// Use cookie parser middleware
app.use(cookieParser());
// Create Vite server in middleware mode
const vite = await createViteServer({
server: { middlewareMode: true },
appType: 'custom'
});
// Use vite's connect instance as middleware
app.use(vite.middlewares);
app.use('*', async (req, res, next) => {
const url = req.originalUrl;
try {
// Get or create distinct ID
let distinctId = null;
const phCookie = req.cookies[`ph_${process.env.VITE_PUBLIC_POSTHOG_KEY}_posthog`];
if (phCookie) {
distinctId = JSON.parse(phCookie)['distinct_id'];
}
if (!distinctId) {
distinctId = uuidv4();
}
// Get all feature flags for this user
const flags = await client.getAllFlags(distinctId);
// 1. Read index.html
let template = fs.readFileSync(
path.resolve(__dirname, '../index.html'),
'utf-8'
);
// 2. Apply Vite HTML transforms
template = await vite.transformIndexHtml(url, template);
// 3. Load the server entry
const { render } = await vite.ssrLoadModule('/src/entry-server.jsx');
// 4. Render the app HTML
const appHtml = await render(url);
// 5. Inject the app-rendered HTML and feature flag data into the template
const serializedFlags = JSON.stringify(flags);
const serializedDistinctId = JSON.stringify(distinctId);
const scriptTag = `<script>window.__FLAG_DATA__ = ${serializedFlags}; window.__PH_DISTINCT_ID__ = ${serializedDistinctId};</script>`;
const html = template
.replace(`<div id="root"></div>`, `<div id="root">${appHtml}</div>`)
.replace('</head>', `${scriptTag}</head>`);
// 6. Send the rendered HTML back
res.status(200).set({ 'Content-Type': 'text/html' }).end(html);
} catch (e) {
// If an error is caught, let Vite fix the stack trace for better debugging
vite.ssrFixStacktrace(e);
console.error(e);
next(e);
}
});
app.listen(3000, () => {
console.log('Server started at http://localhost:3000');
});
}
createServer();

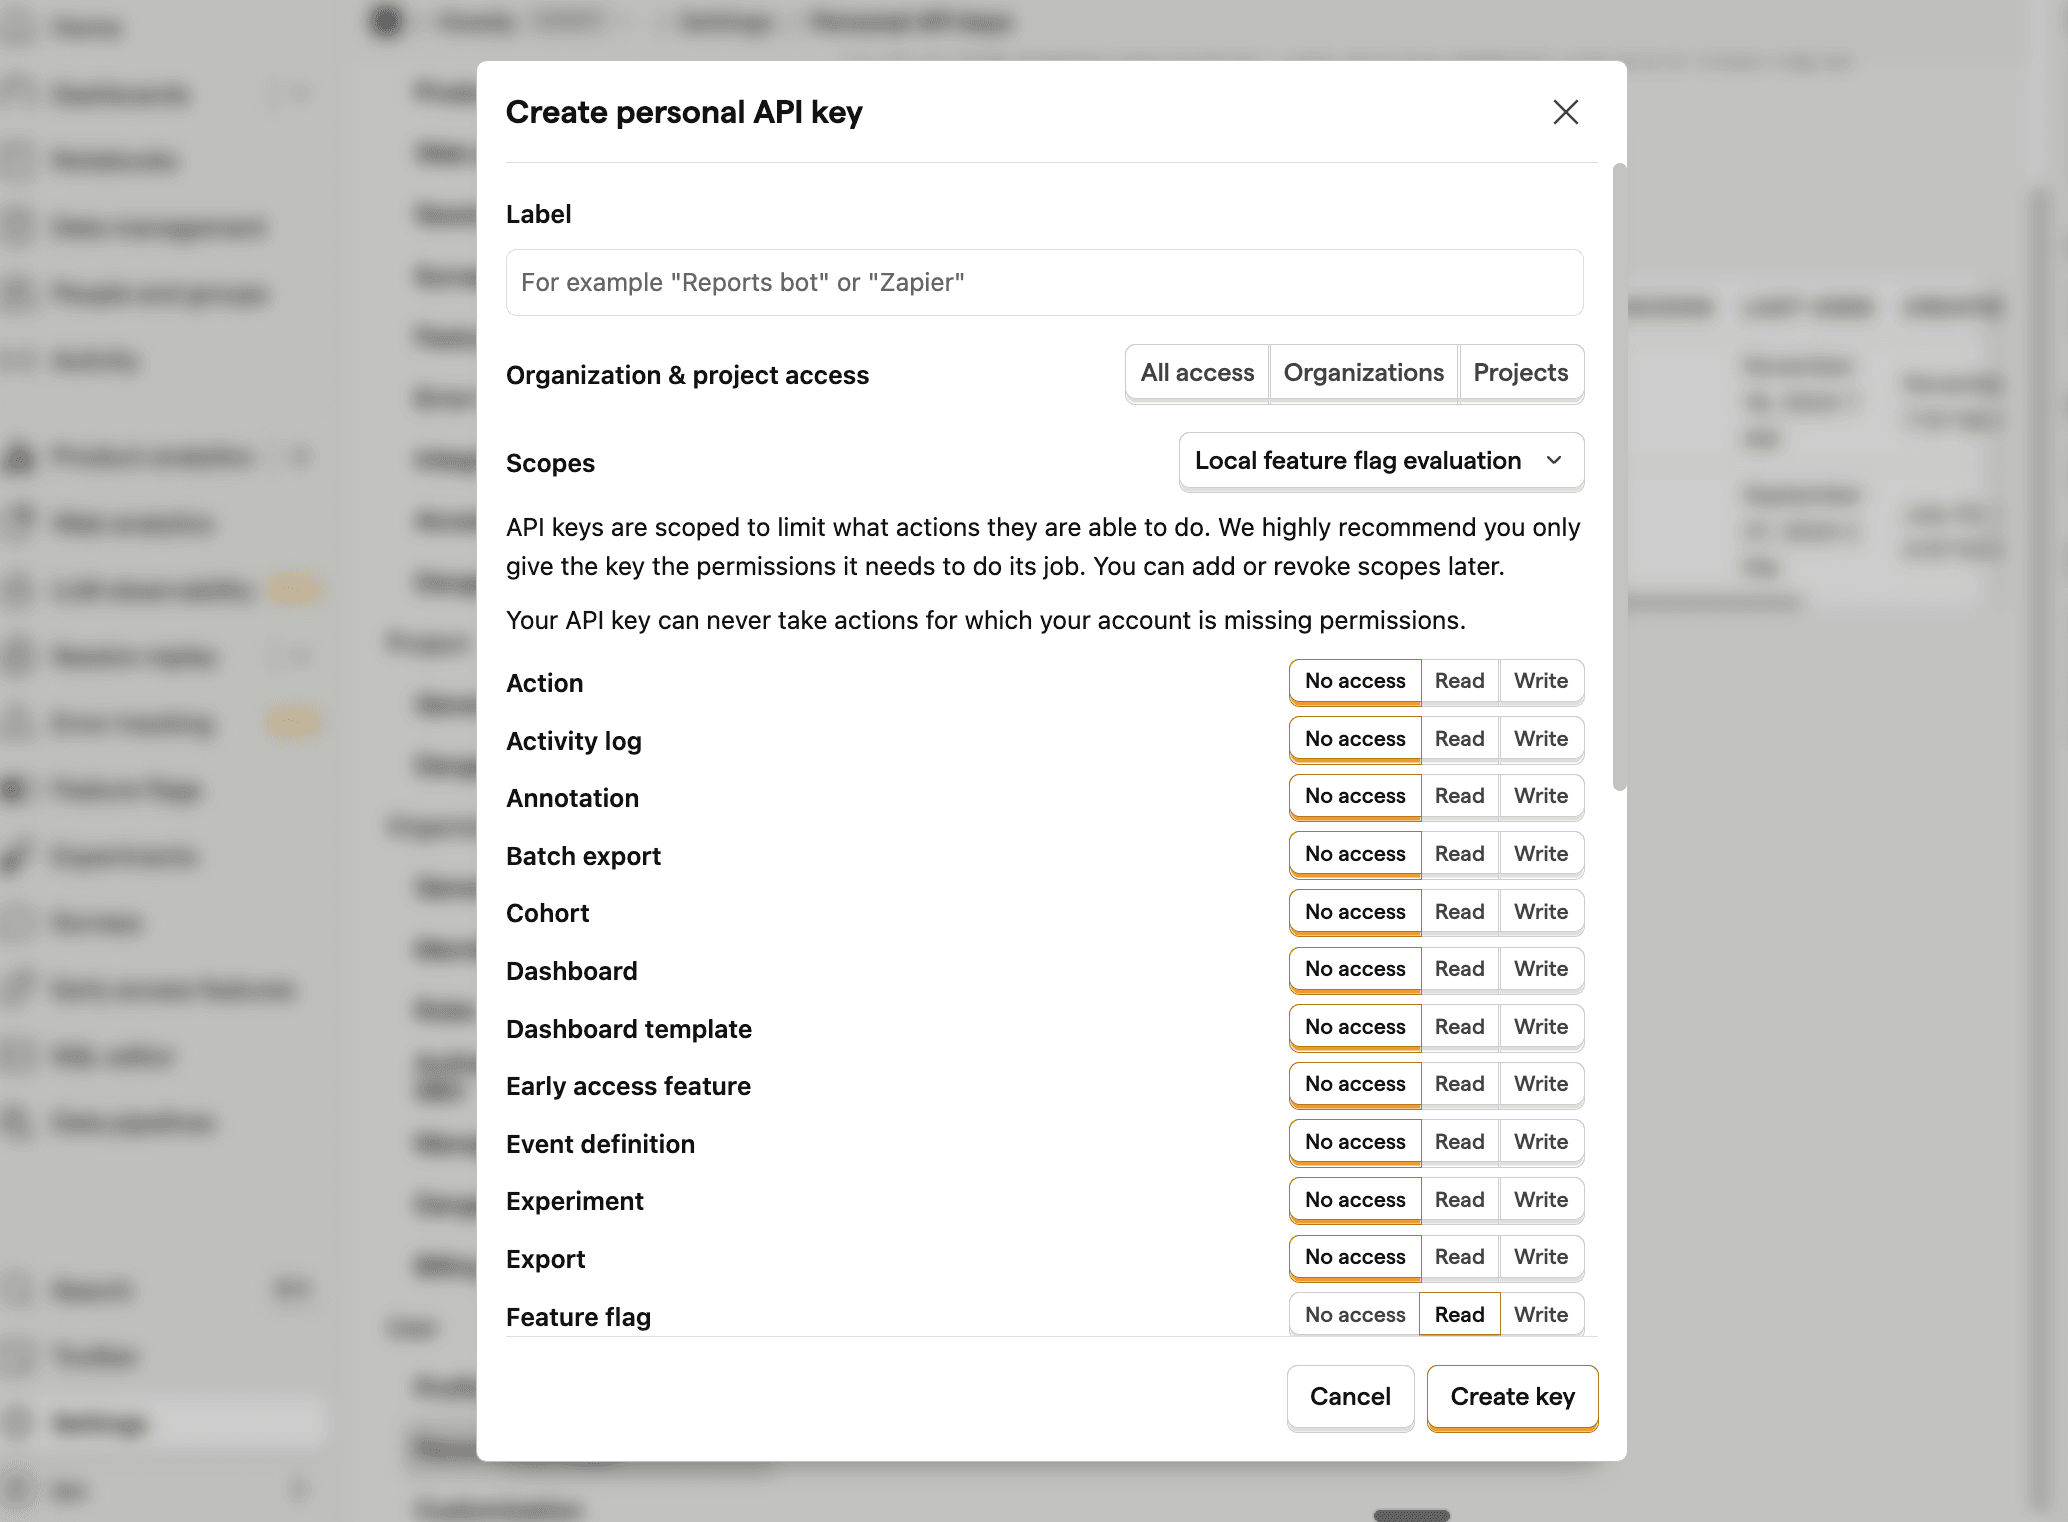
Once you got this all set up, you need a PostHog personal API key. To get one, go to your user settings, click Personal API keys, then Create personal API key, select All access, and then select the Local feature flag evaluation preset.

Creating a personal API key in PostHog

Add it to your .env.local file:

Terminal
# .env.local
# ... rest of your environment variables
POSTHOG_PERSONAL_API_KEY=phx_your-personal-api-key

Your React app will now be server-side rendered with the feature flags data injected into the HTML.

Bootstrapping the feature flags on the client

The last thing we need to do is bootstrap the feature flags on the client. To do this, we'll update our client entry point to use the bootstrapped data:

JSX
// src/entry-client.jsx
import { StrictMode } from 'react'
import { hydrateRoot } from 'react-dom/client'
import './index.css'
import App from './App'
import { PostHogProvider } from 'posthog-js/react'
// Get bootstrapped data from window
const flagData = window.__FLAG_DATA__;
const distinctId = window.__PH_DISTINCT_ID__;
const options = {
api_host: import.meta.env.VITE_PUBLIC_POSTHOG_HOST,
bootstrap: {
distinctID: distinctId,
featureFlags: flagData,
},
loaded(ph) {
console.log(ph.isFeatureEnabled('test-flag'))
}
}
// rest of your code...

Once this is done, we can run the server:

Terminal
nodemon --watch server --watch src/entry-server.jsx server/index.js

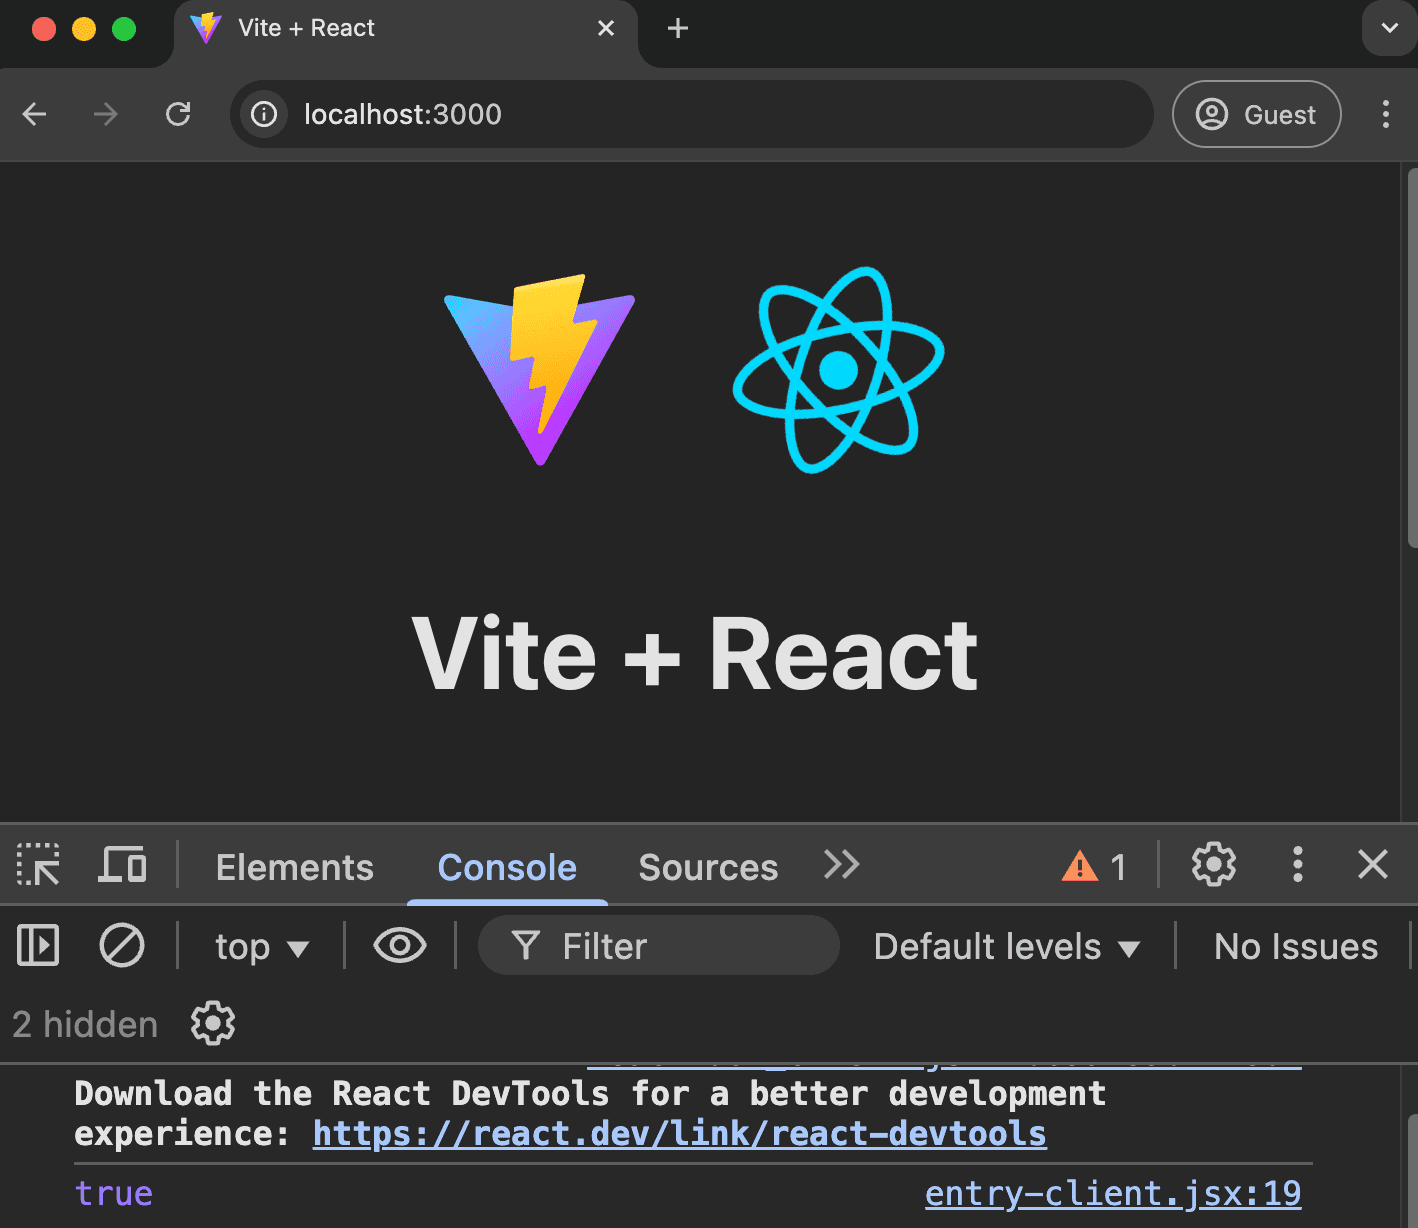
When you visit http://localhost:3000, you should see that feature flags are loaded immediately on the first page load. Open up the site on an incognito or guest window, and you'll see that the flag returns true on the first load without any delay.

It's working

This is feature flag bootstrapping working successfully. From here, you can make the flag redirect to specific pages, control session recordings, or run an A/B test on your home page call to action.

Further reading

Subscribe to our newsletter

Product for Engineers

Read by 45,000+ founders and builders.

We'll share your email with Substack

Questions? Ask Max AI.

It's easier than reading through 609 docs articles.

Comments